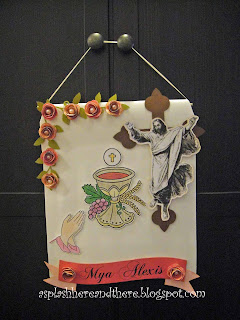
Hello bloggers! This is Melody from A Splash Here and There blog. Thanks again, Pam for letting me share my projects with the Bugbytes readers once a month. I normally post earlier in the day on my scheduled day but forgot it's already June :). Where does the time go? Anyway, I wanted to show you all the First Communion banner my daughter and I worked on for her special day. It is roughly 12 x 16 and all cuts were designed on the Silhouette Studio and cut with the Cameo.
The base of the banner is a white light foam material purchased from Michaels. It is originally 12 x 18 but I folded a few inches back on the top to make a slot for a wooden dowel connected to a strip of ribbon to serve as the banner holder.
Here's a screen shot of how I designed the banner in the Silhouette Studio.
I searched the internet for images of a Eucharist cup, Jesus and praying hands, then imported them onto the Silhouette Studio. I then used the trace feature to make the images more crisp.
In this screen shot, the right image is the jpeg version copied from the internet
while the image on the left (in red outline) is the traced version. After tracing the
images, I converted the images to print only, then used the offset feature to create a
cut line around the images.
It maybe hard to tell on the screen shot above unless you click on the image to
enlarge it, but here the parts in black will print only, while the parts around the images
in red will cut.
This is after printing. The regisration marks on the three corners of the
page will guide the Cameo where to cut.
And here's a look after the Cameo had finished cutting around
the printed images.
My daughter colored the praying hands and the Eucharist cup before we attached them on the banner. We left the image of Jesus in grayscale and attached it in front of the the cross (image by Lori Whitlock - Design ID #26530). The corner leaf vine flourish is by Samantha Walker (Design ID #7319), the rolled rose image is by Silhouette (Design ID #25432) and the banner is by Sarah Hurley (Design ID #38321). I used the Choppin Script font for my daughter's name to print on the banner.
And that's about it. Thanks for stopping by today and have a wonderful week ahead.


8 comments :
Wow! Wow !WOW! This is awesome Melody. Love all the details. Awesome!
Hugs
Pam
Beautiful Melody - do are see some colouring on this project? What markers are you using?
Hey Michelle. My dtr did the coloring on the hands and the Eucharist cup using just Crayola crayons ;)
Thanks Pam!
Wonderful banner and love the flowers! TFS
Pretty banner!!! Love the tutorial :)
This is BEAUTIFUL! Love the details. TFS
Thanks ladies ;)
"kind encouraging and inspiring words"
I appreciate your comments so much. They are treasured and such an inspiration. Thanks for leaving them.