f The Bugbytes: February 2013

Welcome - Copyright & Disclaimer

Welcome to The Bug Bytes a site/blog mainly for Papercrafting and some photography and other stuff thrown in here & there. Add in some die cutting machine, scrapbooking tools, cameras, scissors , glue and...... My name is Pam. If you have been redirected from Papillon Digital Design you have come to the right place.Hope you get inspired by the projects, videos and files. Would love it if you could leave comments and become a follower. (Word verification is turned ON to avoid spam. Sorry for that inconvenience.) Would love it if you would also share your project here . If you find a linky under the post do share your project by posting link there or if you do not find a linky post your link in the comments.Thank you for visiting. The website Papillon digital designs has changed to Papillon Digital Design so if the link gives and error or takes you to page with chinese characters then please drop the 's' in the link at the end of papillondigitaldesigns and try . That is change papillondigitaldesigns to papillondigitaldesign and try the link.

February 28, 2013

simply b feb challenge

This month the challenge (facebook simply B challenges) was to make a project using an image (given by them and this time we had to choose either a girl or boy) but without using pastel colors. All easter image without pastels!
So here is my card and I had to use the new mini 8 border  punch which I got recently
some twines, charm, burlap and square rhinestones completed the card. I also used a piercer and orange and white gel pen to make fauz stitches
Used Copics of course on the images
For face - E00, E02, E11, E13
Blues - E9 family
Browns - E3 family and a little bit of E5 family
For the inner ears and lips a bit of E04

post signature

February 27, 2013

Birthday Memory File


Happy Thursday everyone! This is Java Jen from JAVA JEN CREATIONS and it's my turn to be a guest designer! Thanks, Pam, for the opportunity!  Today I want to share a memory file that I made for a friend's 16th birthday. I love Heidi Swapp's memory files so I created one to help my friend remember her special day! Here is a picture of the completed file and then I'll go into more detail.


I started with a plain, standard size file folder.


Next, I covered it with paper and stamped the corners with some decorative stamps in my stash.


I then began making some elements and embellishments for the cover and inside. I used several Cricut cartridges, including Fabulous Finds, Graphically Speaking, Art Philosophy and Tags, Bags, Boxes and More. I stamped them with stamps I had.

Next, I made a mini book to go inside for putting pictures. I, again, used stamps from my stash to decorate the pages. You will notice that all the edges are inked. I like how that really completes the look. I just used some paper scraps to make page-turning tabs.

Now for the fun part of putting it all together! I forgot to mention that I used Kraft paper to line the inside of the folder. The pockets on the right side are from 7 Gypsies and the tags in those pockets are from My Mind's Eye. 


More close-ups:
I used Liquid Glass from Close To My Heart to accent the letters.

I wrinkled up the tickets before adhering them to add some dimension.


Another look at the finished file:


Thanks for stopping by today! I hope this inspires you to make a Memory File of your own!


Java Jen


February 26, 2013

Canadian Girls Rock

Hello my Crafty Friends!!!!
Sherri here from Sherri's Crafty Place with a card I have made 
I recently purchased a set of stamps from Pink by Design, called Canada.....which is GREAT cause I am Canadian!!!! and as a Canadian crafter it is kind rare to find Canadian stuff, so when I saw Sarah had created this set I knew I must have it!!
Using my Rock Princess Cartridge, I cut this Rockin (Canadian) Girl out at 4.50 using my Gypsy( she was a little big, so my card needed to be 6x6)
I always leave all those little pieces on my mat while I am piecing my images together
I scored my Card Base on my Martha Stewart Score Board..LOVE IT!!!!
 I added some studs with my Imaginse I-Rock (must have tool)

 Canadian Girls Rock stamp from Sarah @ Pink by Design
 and the finished card, I love how it turned out!!!
the zebra paper is from a paper pack at Michael's and all other paper is SU

Thank you so much for stopping by today
❀Sherri❀

February 21, 2013

Petal Box and Mini Cards


Hi Everyone

Michelle here from Lady of Leisure Ink - as always Pam thank you for allowing me to play in your space.  Today I have a really cute Petal Box which is a brand new file created by Kelleigh Ratzlaff which is available here at The Digichick.

Here is a look at the box (before I decorated it up.)


As with all Kelleigh's file this box is super easy to put together - I cut this on my Cameo, folded along the score lines and put some glue on a couple of the tabs DONE!

Before you see the decorated box, here is a look at the stamp on the bottom inside of the box - this is from a Stampin' Up set called 'Circle of Friendship'.


I wanted to make some mini cards to put inside, so I searched through my scraps and found enough matching paper to make 6 minis.  All the paper is from My Minds Eye 'Lost and Found' and the stamps are mainly from a Close to My Heart set called 'It's Your Day'.


Then I set about decorating the outside - armed with more scraps and stamps, this is how it turned out.


Thanks for stopping by today.

Michelle

February 20, 2013

The Month of Love - Valentine Home Decor

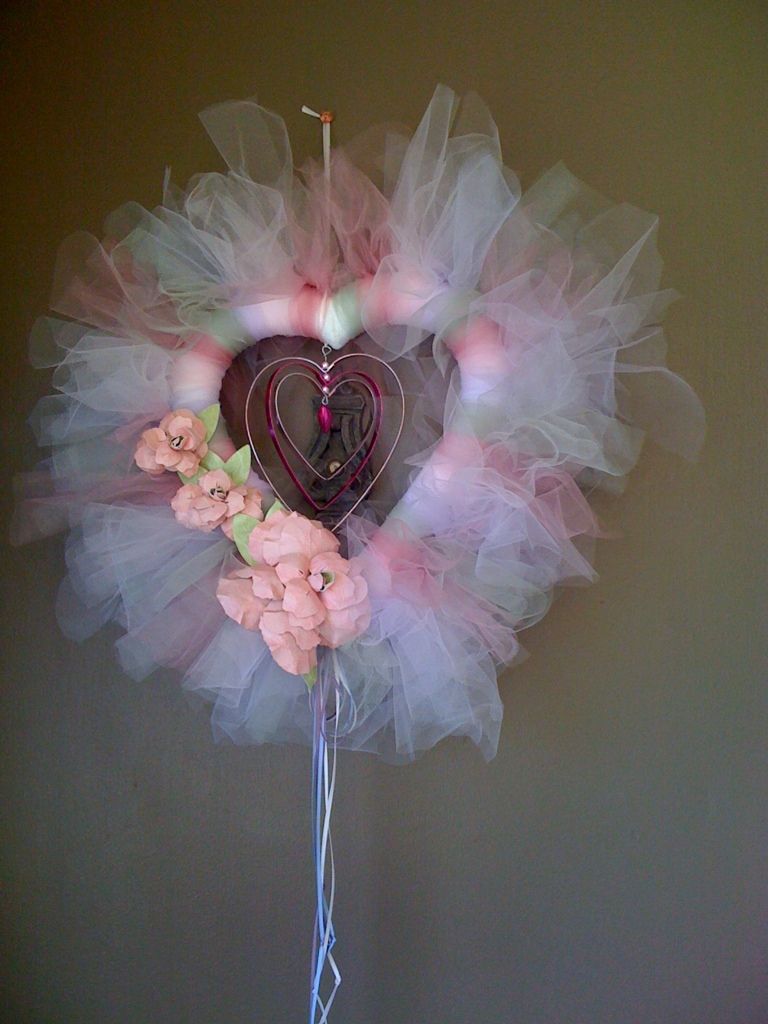
Hello my friends. It's Linda from TheTulipCollector here today with some home decor that will hang on our front door for the month of February. I started with a foam heart shape and got out my tulle in 2 shades of pink, grey and lavendar. I cut pieces 6" wide and about 12" long and just tied it around the heart. The sparkly metal hearts dangling in the center were a find in a clearance bin at Joannes. You know because Valentines goodies are on clearance before Christmas!!! I wanted to add large flowers on one side so I got out Cricut Cartridge Giant Flowers. These were cut at 5", 3" and 2".  I added some of the thin satin ribbon in the same colors as the tulle. This turned out to be a pretty wreath. I hope you found some inspiration today.


February 19, 2013

'Birthdays are Fun'

What a fun challenge we have at DS4J this week.


THEME : 'Birthdays are Fun'. It's  a birthday bash!!  
So Create a papercraft project or card to fit the themeYour creation/card can be anything to do with  BIRTHDAYS!!! It can be for ANY age as well!
So do come and join us there and win some prize.


The card base is cut using silhouette Sd. Made a shape card out of it. Isn't the image so cute? I love how the way she is holding a banner in her hands.
 I had these roses and a white rhinestone ribbon (which I cut into individual pieces instead of adding plain bling) for quite a while - I think I got them a year back from lacrafts. I decided to use them on this card to decorate

The inside has this sentiment


I am going to enter this card in some challenges

  1. http://www.craftysentiments.blogspot.com/2013/02/lets-see-those-fancy-folds-or-not.html
  2. http://inkychicks.blogspot.co.uk/2013/02/challenge-4-mothers-day-or-birthday.html
  3. http://oldiebutagoodiechallenge.blogspot.com/2013/02/bright-colours.html
  4. http://www.craftdoormagazine.com/2013/02/ttrcd-february-19-26-2013.html
  5. http://papermakeupstamps.blogspot.com/2013/02/digi-makeover-challenge-76.html
  6. http://kaboodledoodles.blogspot.com/2013/02/challenge-159-anything-but-square.html
  7. http://mygraficocrafts.blogspot.com/2013/02/time-for-new-challenge-and-more-eye.html
  8. http://cutedaisymay.blogspot.com/2013/02/make-it-girly-challenge.html
  9. http://onestitchatatimechallenge.blogspot.com/2013/02/challenge-151-make-it-girly.html
  10. http://scrapbitzcopics.ning.com/group/cmccopicchallengegroup


post signature

February 18, 2013

Coke Can Jewelry

Hello, it's Danita from danitasdesigns.blogspot.com. 
This month's project is jewelry I made from a coke can. Recycled, if you will.
Really easy project.  Coke Zero is my abosolute favorite drink!!! So I figured I might as well do something with all the cans I have left over. Just punch a hole in the coke can with your scissors, then cut around until you get a flat panel.  Be careful,edges are sharp at this point.


 Next, choose your die. I chose this one because the ornaments look more like earrings and a necklace. Don't worry about your dies getting dull, from my research cutting thin metal actually sharpens your dies.

For this project I am using my brand spaking new Craftwell Ebosser!!!!  You have to get this machine!!!  It's awesome!!!  No more cranking!!!

I love how the Ebosser takes the guess work out of what plates to use with what dies.

The bundle for HSN comes with everything you need to get started.  This bundle cam with a magnetic sheet for die placement. It keeps your dies from moving around while you are cutting/embossing. Fabulous right?  Here I used repositonal tape to hold the coke can down, dies underneath.
I love how the ebosser just pulls everything through, again...NO CRANKING!!!  Which I love because of my carpal tunnel.  And it stops on it's own!! From what I read it has like a 1000 pounds more pressure than the Cuttlebug.

When you finish, just punch out the pieces. Your edges are no longer sharp and they are embossed as well.

I punched holes in the top with a small embossing stylus and a metal piercing mat, but you can use any type of mat for this.

Here's the pieces with the holes punched in the top. You can double the pieces and glue them together if you want your jewelry more weighty.  They are really light weight.


Add earrings hooks, jump rings and, of course....BLING!!!
I hope you enjoyed reading this turorial.  I really had fun making this jewelry. It's quick and easy.  Give it a try.