f The Bugbytes: July 2012

Welcome - Copyright & Disclaimer

Welcome to The Bug Bytes a site/blog mainly for Papercrafting and some photography and other stuff thrown in here & there. Add in some die cutting machine, scrapbooking tools, cameras, scissors , glue and...... My name is Pam. If you have been redirected from Papillon Digital Design you have come to the right place.Hope you get inspired by the projects, videos and files. Would love it if you could leave comments and become a follower. (Word verification is turned ON to avoid spam. Sorry for that inconvenience.) Would love it if you would also share your project here . If you find a linky under the post do share your project by posting link there or if you do not find a linky post your link in the comments.Thank you for visiting. The website Papillon digital designs has changed to Papillon Digital Design so if the link gives and error or takes you to page with chinese characters then please drop the 's' in the link at the end of papillondigitaldesigns and try . That is change papillondigitaldesigns to papillondigitaldesign and try the link.

July 26, 2012

Barn Treat Box using Silhouette Cameo

Hey Everyone,
LisaB from Rather B Scrappin
I recently purchased a Silhouette Cameo and I am in LOVE!!! Today I wanted to show you a treat box that I made for my nephew's up coming birthday party. It is a farm theme. I went to Silhouette Online Store and looked for a barn box, with no luck.
 
Then I saw this box and thought that maybe I could make a barn out of it. So I looked for a barn that I could use and found this image. 


After purchasing both images I opened them in the Silhouette Studio program. When I opened the box I rotated it a little to make the most of my 12x12 paper. This image will be cut in red.


Next I opened the barn. I do not need all the pieces included...


 I deleted the pieces that I did not need.
 I made the barn pieces small enough to be close to the size that I think I needed. Moved both pieces together. Then zoomed way in and adjusted the size of the pieces to fit on the side of the box.

This is just the pieces filled in with color so you can get idea of which ones to group together to cut out.

Then just group the same colors together and cut out the pieces.


The finished box!!!


I hope I was able to inspire you today! Thanks for stopping by and checking out the Bugbytes
Until next time!

July 24, 2012

Shaped Card and Copics!


Hi ya everyone!  Melissa from Melissa Made here to show you a simple shaped card I made with the adorable new stamps from Tiddly Inks.  The set is called Hang in There and features a little girl hanging upside down in a tree.  However, I used some of the accents to create this card with my Cuttlebug and a few Spellbinders Dies.  I created a simple video for you too I hope you enjoy!
Thank you for watching today and a big thanks to Pam for letting me share!  For more fun projects stop by Melissa at Melissa Made

July 22, 2012

Celebrating Diwali!


Good Morning and Happy Sunday everyone!  I am happy to share a new scrapbook page with you today. This baby has been a work in progress. I started it in February, put it aside, and well, finished it sometime in June. That's how these pages seem to be going for me lately.  I want to give a big shout out to my friend Pam who was so kind and generous in sharing her lights file with me.  I really should have covered the page in them, but instead I opted for just one.  The picture is of my best friend Brandy's daughter all decked out for their most recent Diwali celebration.  She is truly a beautiful little girl.


Recipe:
Paper:  Basic Grey - Indie, DCWV Dazzle Stack
Silhouette:  Background lace pattern, shapes, light
Bling:  My stash

Thanks so much for stopping by!

July 19, 2012

Fun Ribbon Storage Idea

Hi Everyone - Michelle here from Lady of Leisure Ink.  I have been so busy recently with my kitchen remodel that I haven't been playing much in my craft room :(  The kitchen thing has taken about 12 weeks - blinds were put up on Tuesday, we had the air ducts cleaned yesterday morning and friends arrived from the UK to stay with us yesterday evening.  PHEW!

So I hope you won't mind that today is not actually a craft project but a little peek at the way I keep a particular supply in my craft room.  It's just the fun way I decided to store my ribbon.  I bought a couple of small wire dress forms from Hobby Lobby when they went on clearance, then I found a couple of bigger ones and bought those too.  I'm not really sure what I had planned to do with them beyond sitting them in my craft room to 'look pretty', but here is what I did.


I just love how they brighten up what would otherwise be a very plain area of my room.  I can have access to all the shorter lengths of ribbon, they just look too pretty to be hidden away in a drawer (I won't mention the other drawer full of spools of ribbon I have stashed away.)

Here is a close up so you can see how they are looped around the wires of the form.


When I need a particular color of ribbon I just take my project to the dress form and choose, it makes it so much simpler for me - not to mention every time I look over to the corner where they are it makes me smile.

Thanks Pam for having me over to play - until next time.

Michelle


July 15, 2012

Created from Color - Advanced class

I loved this class. Learned a lot about shadows and light source.
This time around instead of choosing our own image we had to work with a image given to us which covered most of what we had learned.

Tough one! So I printed about 5- 6 and started working after just looking at it for a week lol.
Finally I couldn't stand the pressure and put my copic to work. Initially I just blocked in the colors on 1st one. No intention of blending or anything! and then I worked on 1st one. It was night. By the time I came to end - I had left water for  last -I messed up on the water in the foreground! Yikes!
Water is meant to lay flat! so always paint it with horizontal strokes to convey that. The background water was ok but in the foreground water was a little messed up
So of course I had to trash that and start again. But  decided to do it next day in the morning after breakfast.


Here's my final image


Here are both side by side so that you can compare.
 Left one is the wrong  one


Here is a card I made from the image.
Yeah after a long long time I finally went up and used my Imagine machine.
The pattern papers are from Audrey. The yellow patterned paper cut is from Lacey Labels. I eyeballed the size. The striped pattern was cut using a 1:2 rectangle at about 5.75 inches height. I inked up a cake doily in blue red and yellow and added that too as another layer. I added a crocheted flower with button center which I had made before as embellishment and some bling


The sentiment is from paper trey ink and the label cut is from nestability.


post signature

July 14, 2012

Mocking Bird

Hatching Season.
2 kinds of birds are found nesting and hatching around my area. The white tipped doves and the mocking bird. The doves laid their eggs in oak tree well above the eye level but these mockingbirds!
Well let me warn you. These try to build their nest wherever! Before  the eggs hatch not much of a problem -  but oh boy! when they hatched- Flying squads!!The parent birds attack!!  Even my dogs could not go outside and do their business in peace. For about 2-3 weeks we had to keep a broom and take it with us fend them off. When I shared this with our vet she said yep they do that and asked us next time to remove the nest before they lay eggs as they are notorious for this.
Oh but the young are so cute.
I could only take pictures with my cell or lumix as no way could I stand there with my dslr and take pics safely lol!

Here's the bush/shrub of climbing roses and jasmine amongst which the nest was built.
I don't know how the mom got them out as they had to move to another place to start flying. Too thorny! But it did offer a good protection from other predators and the fence gave a good support during the heavy wind and rain. Guess that's why it was chosen.


Here they are through their stages.
3 eggs


Nature is a Miracle isn't it?

post signature

July 13, 2012

Simply Betty and Saturated Canary

Good Morning all,

Today I thought I'd share with you a couple of cards I've made recently. The layout's are the same in both cards but different stamps and coloured papers.

The first card is a mix of two different stamps. The artist digi is from Simply Betty. The olympian on the canvas is by Saturated Canary I just shrunk it and put it on the easel. This card is for a teaching assistant at work who is leaving. She's a fab artist and we've been studying the Olympics as a topic this term. I thought the two summed her up perfectly.

This image is from Saturated Canary. It's very sweet and I wanted to use some bright colours as our weather at the moment is non stop rain. We need some sun.

I hope you liked these cards. Take a look at their sites as their designs are stunning. Thank you Pam for having me today.

Check back over the weekend for some more projects I'll be sharing.
Kelly x
Kams's Crafty Place

July 12, 2012

Cricut Couple on The Bug Bytes...

Hey Ya'll,
Bobby here from Cricut Couple.  Have you ever been in one of those places where you hit a brick wall with creativity?  You go the your craft space, sit in your chair, look at all the amazing things you have been blessed with and then NOTHING???  I think part of it goes with a super busy life right now and the other comes with getting a little too organized.  We just remodeled our craft room and it's wonderful... we are very blessed... but I am finding it a little more difficult to create without my chaotic mess that I had before.  Hee! Hee!  So... what can you do?  This is something I tried and I hope it helps you out too...

I found a wonderful paper stack on clearance at Hobby Lobby called Fashionista by Graphic 45.  I simply took a couple of papers out of the stack, got back to basics with my craft knife and the wheels started turning.  I was able to cut a few things of inspiration from the Cricut and add a couple of stamps for sentiments and VIOLA!  28 Beautiful Birthday cards for the stash!

I am sharing a few here today, but have all of them over on my blog if you are interested in looking around.
 For this one, I used CTMH AP for the oval, flourishes and roses.  I used some beautiful striped ribbon from Stampin-Up.  The lady on the front is cut with a craft knife from one of the beautiful patterned papers.
 For this one, I used CTMH AP for all of the shape cuts.  The lady on top was cut by hand and then I used Liquid Glass on the round part of this shape and it really makes the lady in the picture stand out.  I also used Glitter Glue on the scallops of the red oval and on the corners of the floral mat as accents.
 This is a 6x6 eisle card.  I used CTMH AP for the cuts.  I used a Martha Stewart border punch on the red lacy piece on the bottom.  The lady is cut by hand and so is the stamped sentiment.  The Happy Birthday is an old CTMH stamp called Gracious Greetings.
 This is the inside of the card.  You can see that I used lots of 3D adhesive to pop all the layers and added some beaded lace across the top.
 For this one, I used patterned paper.  Since there are two sheets in the stack, I cut the lady leaning around the sign from one and then left the other in tact and used it for a background mat.  The cuts are from CTMH AP.  Instead of putting the scalloped oval around the sentiment oval, I turned it the other way to look like a frame around another lady on the background mat.  I also added some liquid glass to the ladies eyes, lips and jewelry to make it stand out a little more.
 The next one is very simple.  I just used this beautiful paper in it entirety for the background and simply added the oval sentiment in the center with a bow.  The paper is so striking that it really makes the card on its own.
 This one is another eisle card.  I cut some of the flowers from a scrap of paper and used it in the bottom right corner.  I used a perfume label with 3D adhesive and added a card shape that was in the paper pack.  The stamp in this one is from the CTMH AP collection.
 For this last one, I used Splish Splash Lite Cricut Cartridge and cut the perfume bottle.  I used some metallic gold paper for the accent pieces of the bottle.  I also hand cut a perfume label from the stack and added it to the bottle.
As you can see, it's still there.  Sometimes you just have to have a little inspiration to find it.  So... rather than playing with something, I thought that maybe a little encouragement would be helpful.  If you find yourself sitting in your craft space wondering what to make and getting frustrated with yourself... just pick something beautiful and go back to basics.  Get out that old stamp set, that old craft knife or anything that made you fall in love with paper crafting in the first place.  It's all there and it's all fun, so go for it.  Afterall, what do you have to loose?  Everyone can always add more to their stash, right?  Hee! Hee!

Thanks so much for visiting The Bug Bytes today.  Thanks so much for Pam for letting me share too!  If you want to check out the rest of the fashionista cards, feel free to visit me over at Cricut Couple anytime!  We would love to hear your comments today.

July 9, 2012

Makeover Smash Layout (Washi Tape Tutorial)


Hi ~ Lori here from ScrappinMyStressAway with a "Smash"ing layout.  

My friend Allison nominated me for a makeover last summer at our local outdoor mall.  Me and two other ladies got clothes to model and a makeover from Ulta.  It was so fun.  I used these extra photos to create a layout in my Smash Book.  

I am a little uncomfortable just "Smashing" random things, so this looks more like a typical layout....but I am trying!!


I used Quarter Note to weld my title.  The letters are sized to 1.42 inches.


I needed to cover up this flower paper (it was too much for me!) so I made a fold-out page on the left side.


I used my circle punches to create the tab and smaller photos to use in place of embellishments.

My son was our driver.  He drove us from the courtyard area to Ulta and back.  You can see him here checking his phone bored out of his mind!!!


To add interest, I wanted to use some Washi tape, but I did not have any that really matched the color scheme I was using.  So I made my own Washi tape!


I bought Nexcare medical tape to make my own Washi tape.

I put strips of tape on wax paper and used my stamp pad inks to color the tape.  Then I used rubber stamps to create designs on the tape.

Make sure you give the ink a chance to try before you stamp the images on.


I used several stamps from my stash to experiment.  For this layout, I used Dictionary from Pink by Design.


I hope you give the tape tutorial a try ~ it was fun!

Thanks Pam for having me over today!!!


July 8, 2012

Butterfly Card


Hi Crafty Friends :)

Today I am sharing a post from My Blog and here at The Bug Bytes
Thank you Pam for inviting me again this month :)

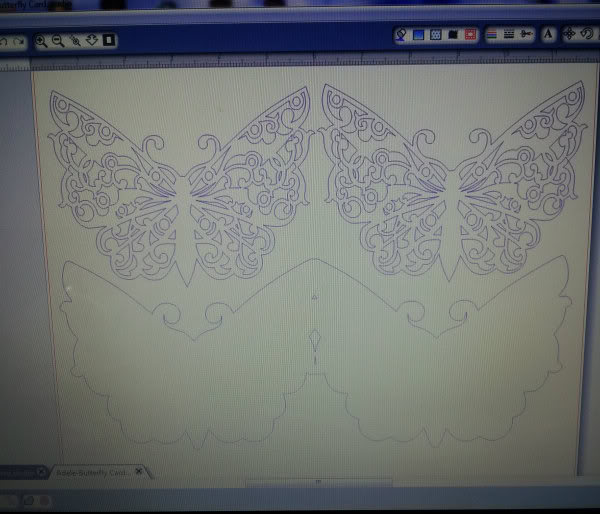
My design this month is a simple butterfly card, I made this using my Silhouette and an old butterfly design, (I'm not certain if the butterfly was bought or created, I have had it for a few years now and forget !!)


I made the card base by welding two shaped butterflies together (please excuse the bad pictures)


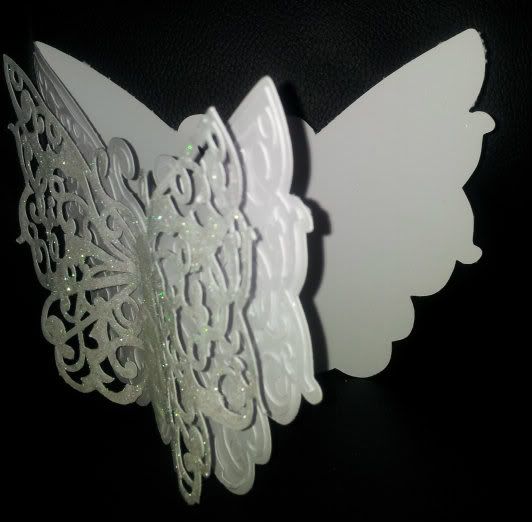
After applying one layer of the filigree butterfly on the folded base card, I attached the second layer only gluing the middle body part, to allow the wings to be free
I glittered this top layer  to add a little bling :)


A really quick and simple card, yet very pretty,  the file for this card can be downloaded HERE

Thank you for stopping by today and thanks again Pam for allowing me to share my post on your Blog :)

Happy Crafting

Hugs

Adele