f The Bugbytes: September 2011

Welcome - Copyright & Disclaimer

Welcome to The Bug Bytes a site/blog mainly for Papercrafting and some photography and other stuff thrown in here & there. Add in some die cutting machine, scrapbooking tools, cameras, scissors , glue and...... My name is Pam. If you have been redirected from Papillon Digital Design you have come to the right place.Hope you get inspired by the projects, videos and files. Would love it if you could leave comments and become a follower. (Word verification is turned ON to avoid spam. Sorry for that inconvenience.) Would love it if you would also share your project here . If you find a linky under the post do share your project by posting link there or if you do not find a linky post your link in the comments.Thank you for visiting. The website Papillon digital designs has changed to Papillon Digital Design so if the link gives and error or takes you to page with chinese characters then please drop the 's' in the link at the end of papillondigitaldesigns and try . That is change papillondigitaldesigns to papillondigitaldesign and try the link.

September 30, 2011

Happy Fall Ya'll !

Waving a big hello from Texas to all of you ! This is Debbie O'Neal from Deb's Eclectic Thoughts. I am a new member of The Bug Bytes DT and thrilled to be here to share some of my scrappy inspirations with you all.

Even though it has been really, really HOT here in Texas, it is officially FALL now...so even though the weather isn't cooperating in cooler temperatures, I still wanted to share one of my favorite fall cards I made.
I just love the warm colors of fall such as burgundy, orange, grey and chocolate brown, don't you?


Since we tend to dress in layers in the fall (it's usually cool in the morning, then warm in afternoon and cool again in the evening), I decided to add lots of layers and texture to the card to mimic the feeling of fall.

I used a rich grey Bazzill cardstock cut at 12” X 5” and folded in half to create the card base. Then I cut a 12”X4” Orange Coordinations cardstock and embossed with “Victoria” Cuttlebug Embossing Folder and then distressed with Tim Holtz Sanding block to expose the color underneath the embossing. Next added a fun orange embroidered trim from craft store towards the bottom, and layered under it a lacy edged border out of fall paper in my stash of supplies using MS Lacy Edge punch. I cut the adorable Scarecrow image at 5” from the Creative Memories Cheerful Seasons cartridge in a variety of fall papers. I stamped his smiling face with a Sizzix Dress up Face stamp and popped him up on the card with foam dots. I cut the Fall Fun words out of burgundy Bazzill cardstock in two different fonts. Using a Inkado White Gel Pen, I added some hightlights to all the cut outs for a finishing touch.

Hope you found some FALL inspiration from this card...it just screams FALL to me. 
What screams “FALL” to you ?   

September 29, 2011

Cricut Imagine!

Well with HP 's press release I wonder what is going to happen to Imagine! Though HP may not be getting out of printer business there has been rumors floating around! But with at least one of PC's employees who were involved so much with Imagine being let go - one wonders! Lol I did not like the Imagine and it is given me lots of pain - physical as I have a whole new slipped disc because of this baby! and hours of frustration but still since I payed so much for it (release) I wonder along with everyone what is going on? and what is in the future! I am beginning to cherish my dear little cuttlebug, my cricut E and my weaving looms and those red adhesive tapes so much. These were nice lovely crafty products and still are  before their software and electronics department took over and messed all the new products up. Am I glad that I have a backup systems which are not PC! Well guess that's how times are. Many had the whole sizzix systems and then electronic die cutting came and we all lined up and now something new is on the horizon! But thinking about it we all left sizzix because we do not want to store umpteen dies! and doesn't the same apply for cartridges as well. Storage is a problem! and with people so much into computers and tablets nowadays - seems to be a more efficient system when you have files out there! But still I cherish my cuttlebug!

September 27, 2011

For those with Art Philosphy cartridge which will not link in gypsy and will not work with CDS, E2 & Imagine!

Remember the Art Philosophy cartridge with that extra dash and extra letter - well it won't still link with gypsy nor will it work with CDS,  Imagine nor the new E2 until there is a firmware update "probably" during next hello Thursday - ie October 20th. Both CTMH and PC are no help. CTMH doesn't acknowledge it's stinky stamps - those having breathing problems - do not open and ask someone else to open in a well ventilated area - wash it once or twice and throw it some corner away from you for a month or more!!
And as for that update - guess you just have to wait for PC to take its own sweet time to give an update! while our money is safely tucked away in it's pockets. Boy do I really really regret  getting a cartridge after a long time! Lately this company's products !! well let's say - consumers  sorry for you if you get stuck with a lemon (and a huge sorry for myself getting stuck with this lemon which is in this case not just this one case but the whole dang batch! so there are many out there). I am appalled! During these times when economy is in a slump and there is a severe competition and people expect more for their buck it's really surprising! Their Marketing Department is good but just that is not enough. Quality and customer care is more important. And I give a huge thumbs down!

September 26, 2011

Scrappin' and Stampin'

Hi scrappers, this is Kate from Sassy and Scrappy and I'm so happy to be here with you today! Last week I took part in an online scrapbook boot camp and I got a chance to learn some new techniques. The class I'm referencing today was taught by Nichol Magouirk and it focused on incorporating word stamps in our layouts. I have used stamps in my scrapbooking in the past, but today I tried something new.

I started by picking out stamps that I thought would be appropriate for my pictures and the story I wanted to tell. Since this layout focuses on my nephew's birthday party the sentiment 'celebrate' was perfect.


In the picture above you can see the 1.5x12-inch border strip in the middle of my layout. I started by stamping in the middle and then worked my way out on either side. For this particular layout I wanted to use my stamps as a subtitle. I think in the future I'd probably make the strip thinner. Or perhaps the layout just seems too busy, but either way it's still fun...and it's done! LOL!


Details:
  • Kraft cardstock: Bazzil
  • Pattern Paper: Echo Park 'Little Boy'
  • BIRTHDAY: Martha Stewart All Occasions Cake Art cut at 1-inch with shadow
  • BOY: Martha Stewart All Occasions Cake Art cut at 1.75-inches
  • Stars: Martha Stewart All Occasions Cake Art-cut at 1, 1.5 and 1.75-inches
  • Stamps: Technique Tuesday 'Real Life By Ali Edwards' and 'Kids Are Cool by Ali Edwards'
  • Ink: Jenni Bowlin-Seed Packet, Spice Tin and Chili Powder
  • Vellum: Papertrey Ink
  • Buttons: Papertrey Ink
  • Tim Holtz Tiny Attacher
Thanks for stopping by. I hope you have been inspired to create! I always appreciate feedback and I'm happy to answer any questions. I'll see you back here soon.

September 23, 2011

Art philosphy cartridge

Oh great !I get a message today that instead of replacing the art philosphy they are working on an update and it May be available on 10/20. WOW! And we know how long the gypsy update "may" take! Base camp is still being updated and if you remember the Cricut Lite -  Celebrate with Flourish!! Boy do I regret getting this cartridge!
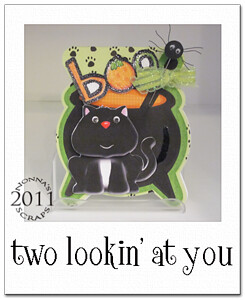
twolookin_9_2011

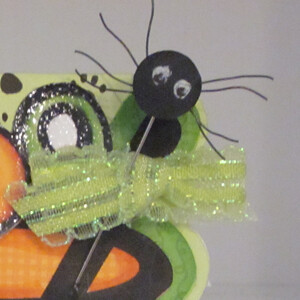
spider

The little spider and I are excited to be a featured on Bug Bytes blog today! Don't you just love the black cat card? I thought it was the cutest little cat---just like my own Gus! Well, I'll give you the ingredients for the card, but the technique is creating the spider stickpin. I hope you enjoy!
Lettering Delights: 
Scared y Cat Collection of images/papers
Basic Halloween SVG

Silhouette SD

Assorted glues

Flower head stickpins

Black paper

Glaze for letters "Boo"


I hope you have a great day and enjoy making these little guys for the holidays! 
Until next time, keep generating the gems!


September 22, 2011

Halloween Wall Decor

Hey Everyone!
LisaB here from Rather B Scrappin.
I am so excited for my first post on The bugbytes.
I want to thank Pam for allowing me to design for her blog. There is a lot of great inspiration in this DT and I know that you will be inspired by everyone!!!

My project is a Halloween Wall Decor. This year I wanted to have more decorations in my home during the upcomming hoilday season so I started with a simple wall hanging.

Banners are really big right now and as much as I love banners I just dont have the room for them. But I do have the room for this type of banner. It can go on any door in the home.

I started with a few pieces of chipboard. The amount will depend on how long the word you want to use.
I cut the shape on the Cricut. This particular shape was cut from Songbird, but you can use any shape you like. I cut my image at 7 inches.

Next I painted the chipboard. You really only have to pain the edges, so the brown does not show through. Which I did on one side. I painted the other side completely because even though it is the back, it will be hanging on french door so you can see it. Again not necessary but feel free to do this, if you are anal like me!

I covered the chipboard with Halloween paper!

Next I cut the letters on the cricut. I cut out each letter 5 times, and then glued them together. This shows the 4 pieces I used as the base. I then covered the letters with the color I wanted the letters to be...purple

Notice the thickness this gives the letters.

Another shot of the thickness

I then hot glued ribbon to the back of each chipboard shape. I used a scrap piece of paper to secure the glue as this ribbon was sheer and I burnt my finger on the first letter. :)

You can then add any additional embellishments to the chipboard pieces to make a great wall decor. 


I hope I was able to inspire you today! Thanks for stopping by and checking out the Bugbytes!
Until next time!

September 21, 2011

Fanciful flight.....

Good morning! It's The Bug Bytes day for me, Beatriz from Amazing Grace today and I am bringing you a great project which I hope it inspires.  I call it the Stained Glass Butterfly.


Using the Tim Holtz Fanciful Flight die, cut out two each large and small solid wings in both acetate and sheet music.  (I use an old hymnal.  Many churches don't use hymnals anymore and have them stacked to the ceiling in a closet somewhere!)  Cut out two each large and small "membrane" wings in black cardstock.  Cut out the body (not pictured here) out of thick chipboard.


Put a drop of alcohol ink on the wings.  Notice how it flows differently on each wing.


Spread the ink blot around using a water brush filled with blending solution.  If the ink blot gets too big, you can always use some blending solution and a Q-Tip to remove some.


Experiment with different colors.  Don't worry if the pattern is not even between both wings.  That's part of the charm.


When the ink is dry, flip the wings over and glue the sheet music wings to the non-inked side.  Be sure to use a clear glue that will stick to the acetate.


 Flip the wings back over and glue the "membranes" to the  inked side of the wings.


 Ink the edges and front of the body and glue the wings to the back of the body.


When the wings are firmly attached, turn the butterfly back over and paint the body with Crackle Accents.  If you'd like, make some antennae out of soft wire.  (Actually, these can be glued to the back of the body at the same time you're attaching the wings.)


 Voila! This butterfly adds a nice bit of color to your layout!


 You can pen in a swirl from his tail to give the impression of motion.


Have a fabulous and blessed day!

September 20, 2011

Birthday Clutch

Hello everyone! Allison from Goody Bag Diva here with apologies for the late post. I spent the night in the ER with my little one, but now that she is alright I am determined to get this post done before I crash. I created this quick paper clutch in less than 15 minutes as an alternative container to wrapping for a little girl's birthday present.

The details: 

This was super easy and quick! Using the purse feature on Forever Young, I selected the "posh" purse and hid contours so that the word didn't cut out on the front. I sized it rather large at 7.30 on the 12 by 24 mat using the Designer Handmade 12x24 paper stack by K and Company. I made it this size because I needed to fit a lip gloss compact and some nail polishes in there. I scored the lines using the pre-cut scores marks and assembled using Terrifically Tacky Tape (ATG does not cut it on keeping the purses together). Then I simply punched a hole in the front and added a few flowers (Recollections and Prima) and a large jeweled brad (Oriental Trading Company). I was done in no time at all - which was good because the party was starting in 20 minutes! If I had to make this again (and I have already had a request from my daughter for one) I would probably add some velcro circles for closure and perhaps a ribbon handle. That's all for this month - and now I am off to bed!

September 19, 2011

Problem with my art philosophy cartridge :(

After a long time decided to indulge myself with a cartridge - art philosophy. First it was back ordered and then I was so excited when it arrived yesterday! So I took out my poor neglected gypsy and updated it - update took an hour and this with imagine updates turned off. And when I go to link - Nope it will not link! Had to wait an hour on call and when I was asked to read the cartridge number - it had an extra dash something like CHA# - # - ###### instead of CH# - ######.
Well now I have to wait for 10 more days! And to boot cricut sync did not read gypsy files. Remember I had this problem before - well PC wasn't helpful this time either with that and went through half an hour or more and played with settings and finally got it to work. After a year or so why should update and linking still be Russian Roulette? Well hopefully that should teach me not to get tempted by cartridges and stick with the one hundred I do have!  lol

September 18, 2011

My Gratitude Journal

I am so excited!  This is my first time designing a project for the BugBytes and I am thrilled to be here!  I want to thank Pam so much for asking me to contribute alongside these other fabulous crafters.  I want to forewarn you - I tend to be long winded and I use a lot of pictures.  Hopefully to the annoyance of nobody!  With that said - let's get right to it.  My project is a Gratitude Journal.  I have been toying around with the idea of keeping one of these for a while as a way to force myself to get happy and put it all in perspective on those rougher days.  I figured why not make one instead of buying it?  Here is the finished product.


I started with two 6x6 pieces of chipboard made by Cinch.  Yes, I could have probably cut some down, but then I would have to sand the edges and I'm lazy - so I bought them!  Using Modge Podge for paper, I covered them with brown paper (Bazzil) on the outside, and then inside is covered using Coordinations paper.  


I decided I wanted to do something a bit different.  I've never worked with canvas before, and I picked up a piece of 12 x 12 while at Archiver's.  I pulled out my Hello Doily stamp from Stampin' Up and stamped on the canvas using Old Olive Stampin' Up craft ink.  Now when I stamp with these larger stamps (or smaller ones for that matter) I also do a few test stamps on scrap paper so I have a good feel for the stamp.  Some of the larger ones take a few tries before they stamp evenly.  After I stamped the image onto the canvas, I was a bit worried because I couldn't see it very well.  But then I covered it with the embossing powder (Adirondack Moss) and the image showed up very well.  I was pleased that I got it on the first try!  


This is what it looked liked after I covered it with embossing powder and shook off the excess.


 Check out my fancy embossing/misting area - hey, why let a good box go to waste?


This is what it looked like after the embossing powder had set.  It doesn't feel as textured as embossing powder feels on paper, but it does look like a very good stamped image.  I was very happy with the result. 


So what's next?  I took a few pieces from my dwindling My Mind's Eye Stella & Rose collection and spent some time inking and distressing the edges.  I decided that I wanted to use the doily image as an offset image, but I needed to cut it out first.  I ran it through my Grand Calibur using one of my Spellbinders circle dies.  It didn't cut 100% through, but left enough of an impression that I was able to trim it with my scissors.  I also inked and distressed the edges of the canvas as well so an absolute perfect cut wasn't necessary.

Yes, I know this picture shows a different color doily - I actually did two - one in Moss and one in Copper to see which one I liked best - I cut them both out using my spellbinders die, but ultimately I went with the green one.


After inking and distressing each piece I adhered the pieces together, and added a bit of straight stitching with hot pink embroidery ink.  I also trimmed off the edge of the doily to make it fit within the square.  I then added some charms from Memory keepers spelling out the word Thankful.  Because I am a slave to dimension (I have yet to find a project I couldn't work it in somewhere) I took a piece of off white paper, stamped the doily again, embossed it with the same moss embossing powder and then cut it out with a smaller Spellbinders die.  I then placed it over the canvas symmetrically, on pop dots of course, and added a Stella & Rose brad to the center.  A pearl flourish, flowing out from the center of the doily was the final touch.  I love, love, love the final look of the journal's cover. 


Okay, let's move on to the inside of the journal.  I thought I could do something easy and just cut out 6x6 squares for pages, but I was feeling a bit more adventurous.  I decided I wanted to have something with a fun border, so I turned to what?  You guessed it - Elegant Edges.  I took one of the borders, hid the inside cutouts (because I wanted it to be solid) and then welded it to a square shape using my gypsy.  I then sat over my Expression for about 30 minutes cutting all of these out.  Well my Cricut actually did the cutting, I mostly watched.  I know a lot of people wouldn't have gone to the trouble of using their machine to do this, but I have several issues as a crafter, and one is that I am not so good with paper trimmer.  I can cut out a 5 x 7 card fine, but ask me to do 40 of those back to back and I can guarantee you that most of them won't be 5 x 7.  My Cricut is far more accurate than I!!


Okay, so now I have my journal pages - am I done yet?  Well, no, the inside was looking a little bare to me so I decided to add something to it.  Just a stamp or something reflective to help me remember why I'm keeping this journal to begin with.  I pulled out my Spellbinders Beaded Circles and cut out this image that I stamped from the Verve Words of Wisdom set and then embossed with copper embossing powder.  


I thought it looked a bit bare so I added some bling around the beads.  Some are Imaginesce, the rest are from my stash.  So I'm done and now I can get this baby bound!  Here it is after I finished punching all of my holes using my Cinch.


And after a bit of finagling, I put it all together by putting the spiral wire on.  I have to say this took a bit more effort that I imagined it would, but I think I might have gone just over the 1" size of the wire so I'll be sure to stay just under it the next time.  This morning, as I went back down to my craftroom to inspect my masterpiece I realized that I had done something really stupid last night at 10:30p.m. when I bound the entire thing together - I glued my oh so cute inside sentiment UPSIDE DOWN.  With hot glue no less.  So, what to do, what to do.  Okay, well I can just cover that up. 


The New and Improved Version!


Ha!  I like it better than the first one.  And I got to add some additional dimension which is always a plus.  The stamp is the same, but I skipped the embossing and stamped it in Chocolate chip, over a pretty flower from Stampin' Up's Blessed Mother's collection (stamped in Old Olive).

So, that's it!  It's finally finished and ready to be used.  I think I'll start on that - tomorrow.  Thanks for everyone who took the time to read through this loonnnnng post.  If you're still with me I hope you have enjoyed what you have seen.  I have a few more pictures to show you of the finished journal, including some close ups.  If you like what you see, please feel free to come visit me at my blog - sabrioletdesigns.blogspot.com.  


Recipe:
Cinch:  6x6 chipboard pieces, Brown Cinch 1" spiral wire
Paper: Stella & Rose, Bazzil, Coordinations, Canvas, Stampin' Up
Stamps:  Hello Doilly (Stampin' Up), Blessed Mother (Stampin' Up), Words of Wisdom (Verve Stamps)
 Ink:  Stampin' Up Chocolate chip, Old Olive Craft Ink, Old Olive Class Ink, Crumb Cake, Moss 
Spellbinders:  Beaded Circles, Regular Circles
Cartridges:  Elegant Edges

Embossing Powder:  Copper, and Moss
Brads: Stella & Rose
Flourish:  My Stash
Charms:  Making Memories

I have thoroughly enjoyed sharing this project with you.  Have a wonderful Sunday!!