November 30, 2010

Good morning everyone,

My name is Melin and you can find me on my blog: CookingWithCricut.com. This is my first post here at Tuesday Treats and I was so honored that Pam and the girls let me join in the fun…Thank you ladies, very much.

Today I am sharing a layout I made using what I call “straight” Cricut. This simply means no design studio or gypsy this time….Sorry Chester, ‘ol buddy, ‘ol pal, you’ll have to sit this one out :-)
So here’s a view of the entire layout.

I used the following cartridges to complete this super fun layout.
George and Basic Shapes
Paper Doll Dress Up
Everyday Paper Dolls
From My Kitchen
Christmas Cheer
Picturesque
Celebrate with Flourishes
Create A Critter
Winter Woodland

Okay here’s the recipe


  • I used Winter Woodland for the sleigh and cut it at 4”
    • I cut the sleigh bottom in white and then “inked” the “ski” part in gold ink. The picture doesn’t show how shiny that part is.
  • The presents were just patterned paper that I cut into squares.
  • The ribbons-bows were from Create A Critter pg. 73 – layer 3 cut at 3.5”
    • The little circles that cut from this cut I used for the reindeer noses.
  • The light borders for the mats were from Create A Critter pg. 73
  • The Sack was cut from Paper Doll Dress Up pg. 72 Accessory 3
  • The Christmas trees in the background were cut from Create A Critter pg. 33
  • The wreath was from Celebrate Flourishes second row, 7th key.

  • Santa’s Suit parts were cut from Christmas Cheer pg. 99 cut at 6”
  • Santa’s Hat was from Paper Doll Dress Up pg. 72 cut at 7”
  • Santa’s Beard and hair were from Paper Doll Dress Up pg. 72 cut at 7”
  • Santa’s Head was from George and Basic Shapes Circle cut at 2.75”
  • Santa’s nose was from George and Basic Shapes.
  • Santa’s Arms were cut From From My Kitchen pg. 77
    Santa’s Body was from George and Basic Shapes. Circle at 3.75”
  • Santa’s eyes were from a punch, but you could cut some small circles out of George and Basic Shapes like the nose.

  • The reindeer were cut from Create A Critter pg. 69 at 3.5” – both layers
    • I used the black out feature so I could use my own eyes. These eyes were a Martha Stewart “tear drop” punch. Pretty small in size.
  • The Antlers were from Christmas Cheer pg. 86 cut at 3.5”-shadow
  • The nose was from the circles cut from the present bows (see above)
  • The “rope” was some gold floss that I had.

  • The Merry Christmas title was cut from Celebrate with Flourishes.
  • The various photo corners were from Picturesque.


Here is one last look at the entire layout. Now it is just waiting for some pictures and a little journaling and we will be good to go.

Thank you for joining me today! Be sure to come on over to CookingWithCricut.com and join in the weekly challenges we have.  Thank you again Pam and all you lovely designers for allowing me to be a part of Tuesday Treats!  Have a wonderful day!
Melin

November 29, 2010

Happy Birthday Kelly

We have another birthday - Kelly of  http://www.kamscraftyplace.blogspot.com -our bugbytes designer.
Wow so many November birthday's.
  Sorry I couldn't post earlier as my computer was acting up .
One good thing is I am able to walk a little now and this gave me all the excuse to go up and craft finally!!
Kelly wishing you all the joy! A birthday never truly ends till the last card comes in!!


November 26, 2010

Happy Birthday my dear son

To my son

"
I remember the day you were born as if yesterday!
It was the day after thanksgiving and also a holy day for us - "kaushika ekadasi"
fasting on this day is auspicious and I fasted as you were to be born by C - section and surgery was scheduled. This day is day for devotees and sacrifices are so honored.
Guess that's why you were born with so many lovely traits.
I know you like to read my blog
So happy birthday to you my dear son.
"

And here I was so devious

Hubby hates cricut product and as I have back pain - could not go to Michaels or Walmart . I slept off at 12:00 and when I woke up no jolly seasons online .
Well today is my son's birthday and I decided to bake him a cake.
He plays drums so seems hubby said if I cannot bake him one he will get one with drums.
So here comes the devious part - I baked and I knew that everyday paper dolls has drumsbut nope doesn't show up in CDS or G search
My son searched on G I tell you and found quarter note[lol] I told hubby how all cartridges are on sale (after baking the cake) and he went and got me quarter note (and a 12 x 12 box) after grumbling. I told him how this way I can not only scrapbook but he gets cake too. And as my other son plays saxophone...
Hubby saw the cake machine up close and personal and asked me the names of all the machines[lol] and then said does this cake really justify [lol] and is there any machine I don't have
But he is happy with the cake an so is my son.
No fondant covering just butter cream frosting and very very light too on eggless chocolate cake . I left the crumb coating with the coating showing to give it a cookies and cream effect.

Not one of my better creations. And it took me the whole day.
My brain and body are not working well together and I was sloppy. The drums kind of stretched when I layered.
But my kiddo is happy and he want a scrapbook layout more so

November 24, 2010

Happy Birthday to Agnes aka Flowerdisco

Today is birthday of one of our dear bugbytes (and sassy) designer
So here is a big hug and a birthday wish
Happy Birthday my dear
Belated Birthday Graphics

November 23, 2010

Cricut gypsy video - Layering Images (lacy labels)

Catherine - This is for you mainly. :)
I only refer handbooks to see colors sometimes and rarely refer to it at all. So this is how I usually layer images using the Gypsy. Catherine asked me to show layering in lacy labels cartridge. But this applies to almost all cartridges.
I might seem a little disjointed. Forgive me for that. Not only is it been a while since I took videos (sassy is doing a fine job:) ) but my back has me distracted!!
So here goes
Part 1 (do not laugh!!)


Part 2

Happy Turkey Day cards

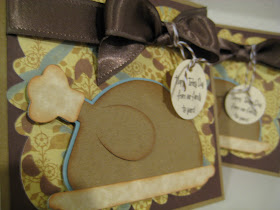
Hi Everyone! I'm Kristy from Craftin' on my door, and this is my 1st time posting a project here at Tuesday Treats!

My family {my hubbie and our 1 year-old daughter} and I will be heading to Southern California to visit our best friends for Thanksgiving! While we are there we will also be seeing my bestie's family, and her hubbie's family so I thought why not make them all a Thanksgiving card!

Here's what I came up with:
I used the Doodlecharms cartridge,  the Lacy Lables cartridge, and of course my trusty Gypsy to get this card started! First, I chose the "turkey," "shadow," and "shadow for the plate." Next, I sized them at 2 1/2", and then used the {duplicate} button to add more.
Then, I used the "Flower2" label from Lacy Labels. I "unlinked" the width and height so that I could make it 5" x 5".
Paper Recipe:
Base of card-Kraft card stock from JoAnn's cut at 5 1/4" x 10 1/2". Then scored and folded in half to make a 5 1/4" x 5 1/4" card.
Brown-Stampin' Up Chocolate Chip
Pattern paper-K & Co
Blue-Stampin' Up Baja Breeze
Cream Parchment-Recollections
Ribbon-Stampin' Up Chocolate Chip Satin
Brown and White Bakers Twine-from a local scrapbook store

I glued the pattern paper down onto the brown paper using my super cute Pink ATG. Then I used the "cheater method" of taping the ribbon to the back of the card stock before adhering it to the base of the card.
Next, I attached each of these to the base of the card. I love to add dimension so I used pop dots to adhere the turkeys to the cards.
Then, I tied on the bows, typed up a sentiment on my computer, punched them out with a SU circle punch, added bakers twine, and attached the sentiments to the bows.

I have a confession to make....I had first cut out the turkeys using the dark brown chocolate chip color (because I liked the way it all matched), but as I was putting them together they looked like {BURNT} turkeys to me! ;) What do you think?
Well, I hope you all enjoyed this easy, but elegant Thanksgiving card! Thanks for having me at Tuesday Treats, and please feel free to hop on over to my blog anytime Craftin' on my door!

Happy Turkey Day Everyone!

<3 Kristy

November 20, 2010

Surprise Winner!

I counted the replies to the Treat Bag post 
(minus mine) and put them in Random.org.  

Here are the reuslts. 


So.... 


NADIA !!! 

If you will email me a mailing address I'll send you a Treat Bag full of treats!  :)  
mrstjf2000 at yahoo dot com

hugs to everyone,   

TR 

November 19, 2010

Gypsy update 0207 - content only

Try doing this with cricut sync if possible.
Keep it connected to power cord as it takes a while. I had to try twice before it update completely. If it just downloads then it is not done. You can always check by going in help and about in cricut sync. It should say content 0207. 
Try also not opening any other window in your PC while updating. It stopped in mine when I did that.
It takes first downloads content which is within a minute
Then it updates content which takes about 10 - 15 mins and then you get a message do not turn gypsy off and after that it comes to your file screen on cricut sync. Once it does that just go to help - > about and check the build.Then exit and also check your G. G build in settings screen should be 0206:0207 and in the cartridge list in the main application-the minis - gingerbread etc and also the new lites should be there.

November 18, 2010

Treat Bag / Friday Nov 19

First I will apologize for so many pictures.
All pictures are small to reserve space but you can click them to make them bigger and read some writing and arrows I've photoshopped on them. 
But I don't know how to do a video YET!  I will, someday!

Hi, it's TR.  I use to have a blog.
ButtonsBugsandBlogs
But I had to delete it some time ago for personal reasons.  And now I'm feeling better and our dear Pam reminded me I can post here. And show what I've been playing with.
So... on with the show. 

This is a little treat bag that, when I made it the first time, was 12x3 and would hold biscotti or chocolate covered pretzels!  Well, I needed a little bit smaller one so I messed with the measurements and came up with this. The final measurements are 5"x3" and I can get 2 out of a 12x12 paper!  It has a vellum window that gives you a peek as to what is inside.  I'm going to put little chocolate covered pretzels and gift cards in it for Christmas. 

To start let me suggest to always use a bone folder on a fold!  
It just makes everything look crisper.

The original cut of the red paper is 6"x9".
Score on the 1,2,3 inch lines on your ScorePal and then flip it and do the same on the other side.  These folds are along the 6" sides.
Then put one along the bottom (or along the 9"side) scored at one inch also.
The vellum is cut at 3"x5". 
And the tag is cut from the Storybook cartridge.
I manipulated it in my Gypsy to measure 5.08"x2.75".

So now lets make it!

Fold along 6" side score lines.
So that it looks like this. 
This is the 6x9 with the folds done.

Put dblsided tape along the inside of the 6" sides. 

Put dblsided tape below the score line that is on the 9" side (bottom)

Pull in the mountain folds and stick to the dblsided 
tape that you just put below the bottom score line. 

Lay the vellum in and then 

fold the side pieces, with dblsided tape, down to the vellum.

It should look like this from the bottom.

Make this picture big by clicking on it.
Trim some of the bulk away by clipping the corners as shown.

This is optional: make a decorative edge with 
scallop scissors. 

Make picture big by clicking on it. 
Place a small piece of dblesided tape here in this nook (at the bottom)

Make this picture big too! 
Place a piece of dblsided tape across this bottom (below the score line).

Fold at the score line

and stick it down!

It should look like this by now from the top!

Cut the tag and then score it in the middle 
and then 1/2" to each side of the middle. 

Fold so that it looks like this.

Fold the tag in half with printed sides together.
And tuck it in the top and along the back.

Staple or glue this tag in. 
I put the points of the staples to the outside 
so that when I did the next step it would cover any sharp points. 

Cover the staples with dblsided tape

and then fold down one of the flaps of the tag. 

This just shows I ink distressed it. 
Can you even tell the difference?

Now, turn it around and this is 
what it should look like from the front and top.

I had a scrap of paper laying there so I used that 
to thread my button!  Hahahahaha Cute trick! 

Turn the button over and put a ZOT dot on it
and trim the paper thread so that it doesn't show.

Placement for button. 

Finished product minus the pretzels and gift card! 

Hope you like this. Sorry it was so long.

TR 

2011 Calendar

Hello crafters.  This is P-Kay Sunshine.  Today I am going to show you a project that is still a work in progress.  Last year on Black Friday I bought my pretty red Expression and I also picked up Designers Calendar cartridge.  At the time I could visualize myself making calendars for everyone.  HA!  In the past year I have only made a one month calendar and I have barely used this cart.  ;-)  I decided to try again this year to make a full 12 month calendar.  This time I used my Imagine. 
First I added a shape and the word January to the screen with the calendar grid.  The reason for adding the rectangle is to get the word January in the middle of the page.  It is used as a filler.


The idea at first was to print the grid with the month.  I later changed my mind and decided to only print the grid.  In order to get it lined up right I had to make the ‘fillers’ white so they would not print.  I changed the color of the rectangle and the word January to white. 

From this point I went to my gypsy and made a file for the days of the week, the numbers and the months.  Gluing all of this down took a while.  I will be SO glad when the Imagine can print from the gypsy! 

I added a piece of patterned paper to the opposite side of the printed grid.  This will give me a surface to design on.  I used my bind it all to make it a book.  My plan is to use each month to make a layout and add pictures of my DD as I go along.  At the end of the year I will have a full 12 page book of the year.  Here are a few pages.


I was in the holiday spirit so I started decorating my calendar with the month of December.   It is the only month I have completed so far.  ;-)  I left room for a photo mat and journaling. 


Thanks Pam for having me!  I hope you all enjoyed my project.  Have a great day!