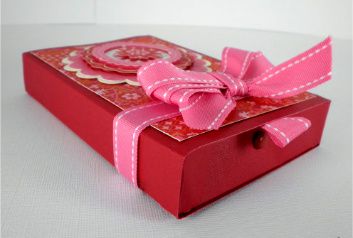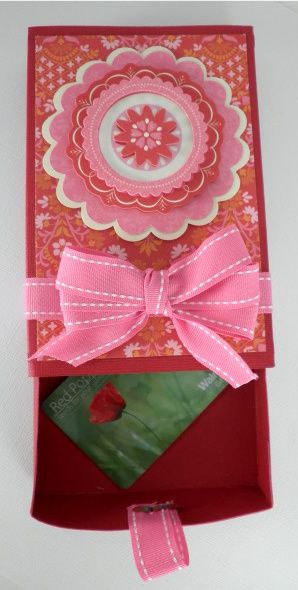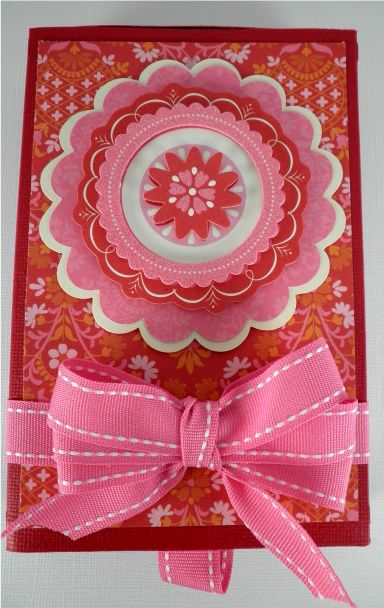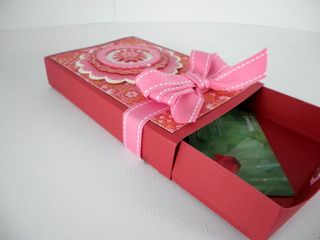
This is Joy from Obsessed with Scrapbooking and Everyday Cricut and today's gift packaging idea is the matchbox cut from the Tags, Bags, Boxes and More Cartridge. This matchbox is the perfect size for a gift card! It just dresses up and makes that gift card a little more special.

Now, this matchbox was made by cutting the matchbox 1 on page 123 of the handbook at 6". This cut makes the outer wrapper. Next, you cut matchbox 2 on page 124 at 6". This cut makes the inner box. There are also options to have a clear window on the outer wrapper which you could cover with acetate that has been stamped with Staz-on - that would be a cool look. I used Core'dinations paper since it is so wonderful and strong!

The top pieces and paper are all from Anna Griffin's Isabelle Line.
To attach a ribbon pull, I punched a hole through my felt ribbon and the box itself and then threaded a large red brad through it. Brad was by Basic Grey. Ribbon is from Papertrey Ink.

A word about the outer wrapper - it's a snug fit. You can rest assured that this matchbox isn't going to suddenly open up and dump out its contents. Altering the size you cut things at significantly changes the way the box works so I don't recommend that. Using my Gypsy, I laid out both parts of the box so I could cut everything once on a 12x24 mat. That helped save time!
Overall, the box was quite easy to make once I figured out that I needed to cut matchbox one for the outer wrapper and matchbox two for the box itself. I use some Georgia Pacific cardstock I got at Walmart to do test cuts and that really helps to cut down on wasting "good" paper. I highly recommend you get some - it's 150 sheets for less than $6 and is in the office supply aisle.


Wow! am I glad that we are doing this for I would never have known That the outside is one page and inside the other otherwise. What lovely papers. I love the ribbon handle.Great job as always ;;) =D>
ReplyDeleteSuch a beautiful box!! Love your color choice and thanks for the great paper idea.... it will save cash. I have just started using the 12x24 mat and it does save time.
ReplyDeleteWow that is so pretty! Thanks for sharing!
ReplyDeleteI do the same thing with the paper....test it out on the cheap stuff from Walmart :)
What a beautiful little gift box! I'd be so thrilled to receive one of these...with or without a gift card inside! TFS!
ReplyDeleteThanks for sharing, I would have not figured out that you had to go to 2 pages to make this box. I love the colors and the paper you used. Great job.
ReplyDeleteWOW JOY! Beautiful! Thanks for the tips....things I learn everyday! :)
ReplyDelete(scrapper1969)
What a beautiful box and tag. Love it. Valentines day came to mind when I saw the box.
ReplyDeleteThank you
Linda in Stanwood
Will we be able to see this box at a later time when we want to make one?
This box is beautiful!!!!
ReplyDeleteI love the colors...and the paper.
TFS!!!!
Love your little emo-cons too cute, where did you get them? My DD would love them.
ReplyDeleteAZDizzylady
I love this... thanks for the tips
ReplyDeleteLove it!
ReplyDeleteThis is really beautiful..need to pull out that cart now!! :) and I need to get some 12x24 mats. TFS
ReplyDeleteWonderful project! Since all my kids have moved away (what's up with that?!) gift cards are the gift of choice. These boxes are the perfect wrap.
ReplyDeleteWhat an adorable little box!! I have 3 gift cards to pass out tomorrow... guess what I will be whipping up tonight!! Thanks!!
ReplyDeleteBarb :)
Such a cute box!! Thanks for sharing!
ReplyDeleteWhat a great project!! I have never tried this cut yet! Thanks for the tips!
ReplyDeleteGreat tips and an awesome gift card box!!!
ReplyDeleteLove this box!
ReplyDeleteLove it!!!! Joy, you did a terrific job on this box and explaining it. I didn't know either about one page for the box and another for the cover. Love the paper you used...gorgeous!! Thanks for sharing and for the tips
ReplyDeleteWhat a beautiful way to give a gift!
ReplyDeletePretty box and a good idea on how to present a gift card.
ReplyDeleteWhat a great box! Beautiful color choices! Thanks for taking the time to work out the details for us so we can make this cut easier!
ReplyDeleteThanks for the tip. I never made one but now after seeing yours I will. TFS!
ReplyDeleteJoy--I just love the gift box!! What a fantastic idea for "Mother's Day", Birthdays, or for all the summer Weddings & Graduations soon to be here!! Your choice of papers is beautiful as well!! My only problem is I am lucky enough to have an Expression, but "NO" GYPSY!! So what do I do to modify all these great ideas???
ReplyDeleteWow that is gorgeous. I love seeing everyone's creations, gives me inspiration. Thanks Joy.
ReplyDeleteLove it! Thanks for the tip to use the 12x24 mat and the gypsy!
ReplyDeleteGreat Job Joy! That is a keeper!!!
ReplyDeleteIt's gorgeous!
ReplyDeleteBTW I followed your suggestion about the Georgia Pacific cardstock from an earlier post you had made and is it ever useful. Not only for trial cuts, but I've been using it as a key component for storing my unmounted rubber stamps.
Great Matchbox! I am LOVING that Anna Griffin Paper!!
ReplyDeleteappreciate the time you give to help us.. I try and remember to write all hints down and keep them going for future references. besides this.. LOVE the box and the colors used. so cute! - I will try it next!
ReplyDeleteI love this. It would be perfect as a wedding favor. Awesome job. Thanks for sharing
ReplyDeleteJoy I have learned volumes from you. Your box says, "FUN!"
ReplyDeleteOh how cute. I don't have that cart, but I will soon. Thank you for sharing.
ReplyDeleteThank you I would of never figured that out
ReplyDeleteBeautful
Really cute gift box! I love my TBBM cart! It's one of those cartridges that is always in my jukebox!
ReplyDeleteThank you for sharing this. It's these types of things I'd never know about when using my Cricut and the cartridges.
ReplyDeleteThis box is wonderful! It has a million uses.
Thanks for sharing!
Sandy
Cute and adoreable box!! Love it.
ReplyDeleteYep Joy this is so sweet! I love the flower embellishment on the top, so pretty! Thanks again for sharing your crafty-licious talent!!!
ReplyDeletecrafty hugs!!
Lisa :)
thanks for the tip on how to do this one...
ReplyDeleteoff to the craft room to give one a try...
Great idea, especially for all the gift giving occasions I have coming up and gift cards are the perfect thing - graduations, Mother's Day, Father's Day, and a few birthdays. Thanks!
ReplyDeleteWOW !! What a great idea for gift cards!! Thanks
ReplyDeleteWhat a great project. A wonderful alternative to giving a gift card. Will be trying this one out for sure!
ReplyDeleteThis is one gorgeous little box! I too would never have known you had to do the cuts from two different pages. Thanks for all you do.
ReplyDeleteR.J.R.
What a great idea for gift cards and it can be used to hold items afterwards...paper clips, earings, "treasures".
ReplyDeletegreat instructions for the matchbox; love the tip about the Georgia Pacific cardstock. I also use those white pages from new scrapbooks for trial cuts; it helps when you want to cut something bigger than the 81/2 by 11 allows.
ReplyDeletelv2scrap02...
ReplyDeleteJoy love the box, thanks for the tips. So pretty and colorful.
lv2dance92@optonline.net
This is so pretty and makes for a wonderful way to send a gift card. The element on the top is beautiful.
ReplyDeleteKim xXx
very cute box, Joy!
ReplyDeleteGreat little box for using on so many occassions. Thanks for the tips on making the top and bottom.
ReplyDeleteBeautiful gift box, Joy! Thanks for the tip about the separate cuts..I would not have figured that out myself. Wish Provo Craft had better instructions. Thanks for the wonderful inspirations we always can count on from you!
ReplyDeleteBeth Anne
Woody42997@aol.com
excellent info and tips, i have tried this cut before and could have used this info...guess i'll try it again
ReplyDeleteThanks so much for sharing the information about this box. I had no idea that you had to cut both boxes to make the one! Beautiful project!
ReplyDeleteSuper cute box! Thanks for the tip!
ReplyDeleteWonderful box!
ReplyDeleteBeautiful and practical. Thanks a million.
ReplyDeleteThanks for sharing this Joy. Your tips are always great! Love the paper choices too! Mary M
ReplyDeleteWhat a pretty box. Thanks for all the tips. I will have to give this a try. I haven't used that cut yet.
ReplyDeleteJoAnn
Love your projects Joy - I "follow" you daily.
ReplyDeleteHi All
ReplyDeleteWe can't forget Mothers day, we need to give thanks to all mothers.
ooooh too cute!!! we are a gift card family and this is going to be a great hit...thanks for the detailed info its going to help me alot
ReplyDeleteWow! I love this box!! It's great seeing it in a larger size!! I can see many possibilities for this!! Thanks for another great project!!
ReplyDeleteThose boxes are so cute. I'm off to Joy's blog.
ReplyDeleteI love the box!!!
ReplyDeleteToo cute!
ReplyDelete